


 Printer Friendly Version
Do you issue recurring invoices to a group of customers for the following?
- Same service or product item
- Same price
- Same billing frequency
- Same invoice template
If you answered yes to each of these questions, you will save time invoicing using the QuickBooks Batch Invoicing feature. There are three basic steps when working with Batch Invoicing:
- Creating your billing group involves naming the group and then assigning customers and/or jobs.
- Selecting the line items and rates for the batch invoices.
- Reviewing the list of invoices to be prepared.
–> Note: To successfully use Batch Invoicing, make sure that each customer or job has important information in their records, including Terms, Send Method, and Tax Status. These items are more difficult to change after processing a batch of invoices.
Using Batch Invoicing
To practice using Batch Invoicing, open the sample data file. You might also use these instructions if you are creating Batch Invoicing with your own data:
- From the menu bar select Customers, Create Batch Invoices.
- If the warning message Is Your Customer Info Set Up Correctly? displays, read the information provided. Your success with using Batch Invoicing is dependent on how well your customer records are set up. The message refers to the following fields that should be defined for each customer before creating invoices using the Batch Invoicing feature:
- Customer payment terms
- Customer sales tax rates
- Customer and Job preferred send method
- Click OK to dismiss the message for this practice.
- The Batch Invoice dialog box displays. Click the Billing Group drop-down list (top right) and select Add New.
- In the Group Name field, type Monthly , and then click Save. Or, if you are creating a Billing Group in your own data, provide a name that is meaningful to your business. Click Save.
- In the Search Results box, which displays all active jobs, select a few jobs of your choice. In this example, three jobs were selected, as shown below. Notice you can search for a specific list of customers, or choose Select All or Clear All for ease in setting up your Billing Group.
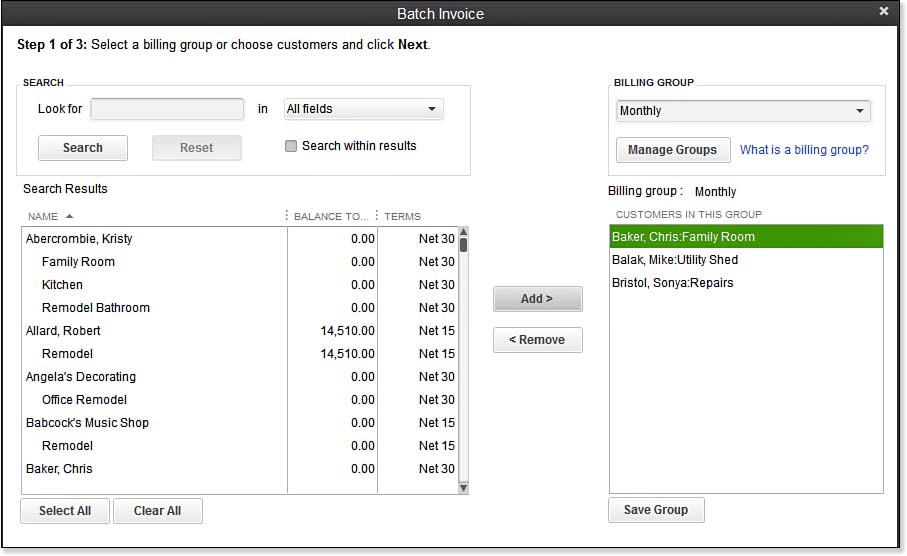
When creating a Billing Group, select the Customers or Customer:Jobs you want to issue a recurring invoice for.
- Click Save Group. You can return to this dialog box at any time to modify the list of customers or jobs included.
- Click Next. Step 2 of 3 displays, as depicted below. Leave the Rock Castle invoice template selected. If you are working in your own data, select the invoice template you want to use.
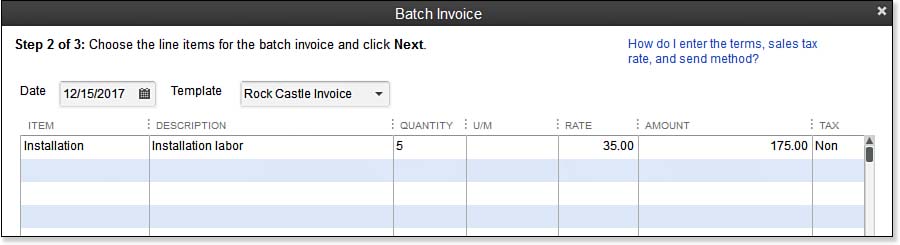
Batch invoices share the same item, description, quantity, rate, and tax status.
- In the Item column, select Installation.
- In the Quantity column, type 5.
- Leave the U/M (Unit of Measure) blank.
- Leave the prefilled rate of $35.00 as was originally stored with the item record. QuickBooks calculates the Amount field and assigns the Tax status recorded with the item record.
- (Optional) Select or add a new Customer Message (not shown).
- Click Next. Step 3 of 3 is shown here. Unclick any customers or jobs you don’t want to invoice at this time.
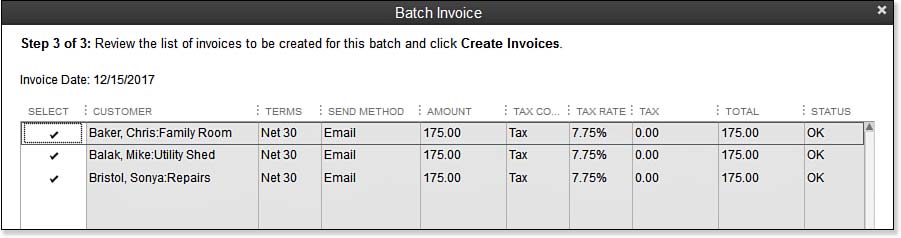
Review the listed terms, send method, and tax settings before creating the invoices.
- Click Create Invoices when you are ready. If any of the fields displayed are blank or show incorrect information, click Cancel. Update the corresponding customer records and then return to the Batch Invoicing menu to complete the steps listed here.
- After you click Create Invoices, the Batch Summary dialog box displays. Here you can print or email the newly created invoices. If a Preferred Send method was not indicated in the Customer or Job record, the invoice will be included in the unmarked total.
From Laura Madeira’s QuickBooks 2013 In Depth