


 Printer Friendly Version
If you are using QuickBooks Premier or Enterprise, you have the option to set up Multiple Unit of Measure. A benefit of this feature is the capability to assign a specific unit default for purchases, shipping, and sales transactions.
To begin using Multiple Unit of Measure in your Premier or Enterprise file, you need to enable the preference setting. To do so, follow these steps:
- Log in to the file as the Admin or External Accountant user.
- From the menu bar, select Edit, Preferences.
- Select the Items & Inventory—Company Preferences tab.
- In the Unit of Measure box, click the Enable button. This button will not be present if the feature is already enabled.
- Select either Single U/M Per Item or Multiple U/M Per Item, as shown here:
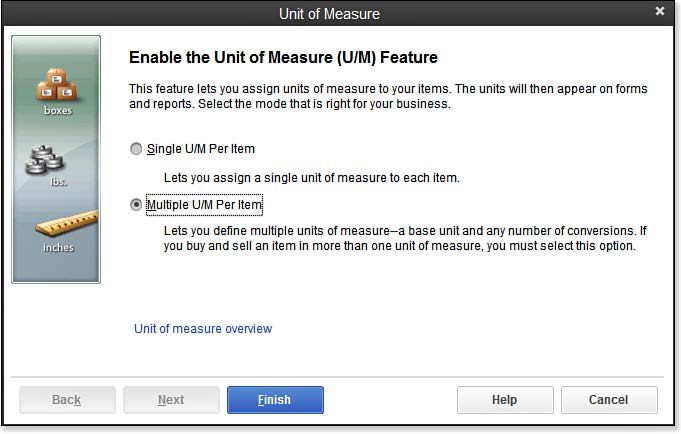
To begin using Multiple Unit of Measure, first enable the preference.
- Click Finish. Click OK to close the Preferences dialog box.
Now that the preference is enabled, create the different unit measurements you will be tracking.
After enabling the Unit of Measure preference, let’s create Multiple Unit of Measure for the Stain non-inventory part. This part was created in an earlier post titled: How to Add a Non-inventory Part in QuickBooks:
- From the menu bar, select Lists, Item List.
- Select the Stain non-inventory part created earlier. Double-click the stain item to open the Edit Item dialog box.
- From the Unit of Measure drop-down list on an existing item, select Add New to open the Unit of Measure dialog box.
- The Unit of Measure dialog box displays. Select Count (each, box, case, dozen, and so on). When working in your own file, if you do not see the desired unit displayed, select the Other option, as shown below, and follow the instructions after you click Next to create a new base unit.
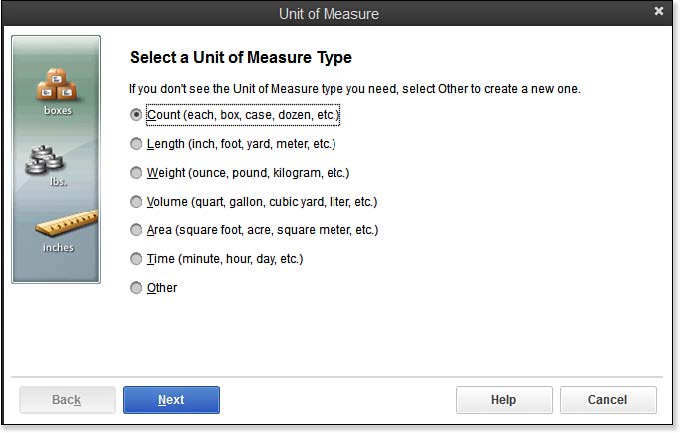
QuickBooks provides multiple units of measure types, or you can select Other to create your own.
- Click Next and select Each (ea) as the Base Unit of Measure for this practice.
- Click Next to display the Add Related Units screen, as shown here:
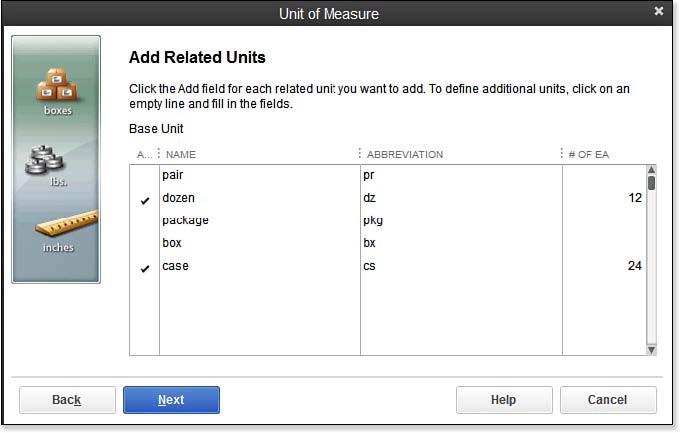
For the unit of measure created, you define the number of base units (in this example # of ea).
- Place a checkmark next to the individual units of measurement you want to add to the selected item (as depicted in the above image, for the quantities used in this practice). Click Next when it’s complete.
- The Select Default Units of Measure screen displays. In the drop-down list, select the default units for Purchase, Sales, and Shipping transactions, as shown here:
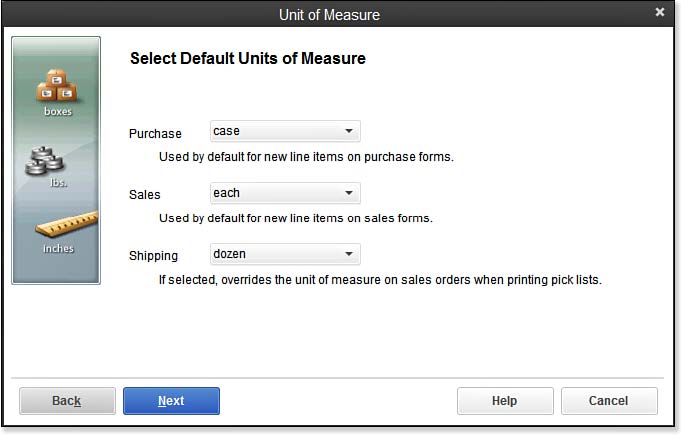
The benefit of working with Multiple Unit of Measurement is the capability to define the default units for specific transaction types.
- Click Next.
- The Name the Unit of Measure Set screen displays. Type a name for the unit of measure set or accept the default that is displayed.
- Click Finish, and the U/M Set now shows the configured Multiple Unit of Measurement assigned to the selected item.
- Click OK to close the New Item dialog box or Edit Item dialog box.
–> A word of caution: When working with Multiple Unit of Measures, if you edit an existing unit of measure assigned to an item, you will be warned “Any changes you make to this unit of measure set will affect all items that use this set.”
With Multiple Unit of Measure defined for this item, entering inventory on transactions will be easier and more accurate.