


 Printer Friendly Version
When a company provides an advance to an employee that is to be paid back in installments, you can have QuickBooks automatically calculate this amount and even stop the deductions when the total of the loan has been completely paid back to the company. QuickBooks will automatically deduct the loan repayments from future payroll checks. Follow these steps to record a payroll deduction on the employee’s setup:
- From the menu bar, select Employees, Employee Center.
- Select the employee who was given a payroll advance or loan. Click the Edit icon in the top right. The Edit Employee dialog box opens.
- From the Change Tabs drop-down list, select Payroll and Compensation Info. The Payroll Info tab displays.
- In the Item Name column of the Additions, Deductions, and Company Contributions box, select your Employee Loan Repay deduction item (and skip to step 14) or click Add New to open the Add New Payroll Item dialog box.
- If creating a new item, select type Deduction and click Next.
- Enter a name for the item such as Employee Loan Repay and click Next.
- The Add New Payroll Item (Deduction) dialog box opens. Leave the agency name and number fields blank. For the Liability Account, select the drop-down list and select your Employee Loans, Other Current Asset account created when you made the employee advance check. (See image below.) Click Next.
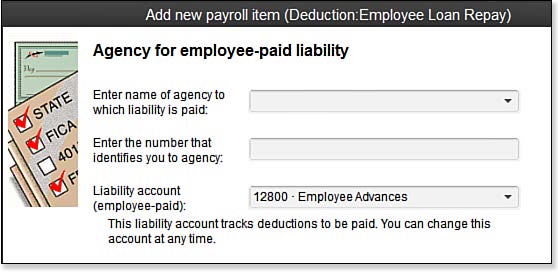
Assign the Other Current Asset Employee Loan Advances as the liability account for the paycheck deduction.
- The Tax Tracking type screen displays. Leave the default for Tax Tracking type of None and click Next.
- The Taxes screen displays. Accept the default of no taxes selected and click Next.
- The Calculate Based on Quantity screen displays. Leave the default of Neither selected and click Next.
- The Gross vs. Net screen displays. Leave the default of Gross Pay. This setting has no impact because you are setting it up with a tax tracking type of None. Click Next.
- The Default Rate and Limit screen displays. Leave it blank because you define the limit amounts individually for each employee. Click Finish to return to the New Employee dialog box or Edit Employee dialog box.
- In the Item Name column of the Additions, Deductions, and Company Contributions box, select the Employee Loan Repay deduction item you just created.
- In the Amount column, enter the per-pay-period amount you want to deduct.
- In the Limit column, enter the amount of the total loan. QuickBooks stops deducting the loan when the limit is reached. Click OK to record your changes to the employee setup.
QuickBooks is now properly set up to deduct the stated amount on each paycheck, until the employee loan has been fully paid back. If you provide additional employee loans, do not forget to go back to step 15 to add the new amount to the previous loan total.