


 Printer Friendly Version
QuickBooks makes it easy to prepare and send invoices to your customers. A basic invoice might contain a single line or many lines, depending on the nature of the products and services you provide.
To practice creating an invoice, open a sample data file. You might also use these instructions if you are creating an invoice for your own customers:
- On the Home page, click the Create Invoices icon. Depending on the sales and customer preferences you have enabled, you might have to select Create Invoices from the dropdown list next to the Invoices icon.
- The Create Invoices transaction displays, as shown below. Select the Rice, Linda:Repairs job.
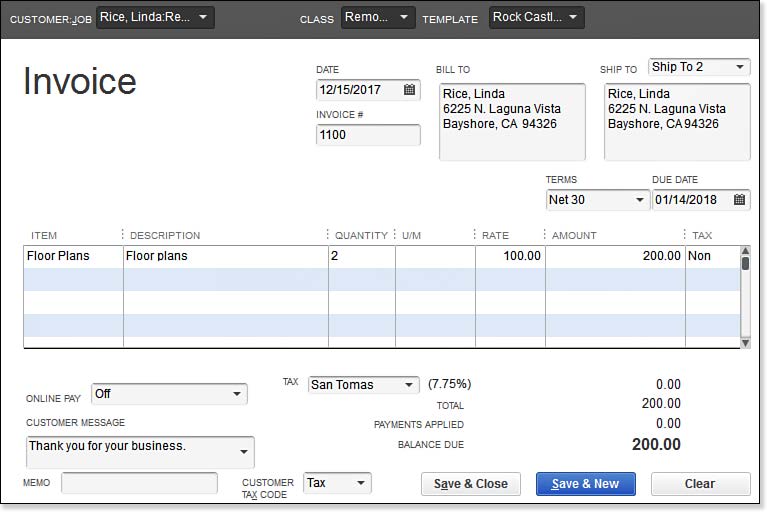
Creating a basic invoice is simple using QuickBooks.
- In the Class field, select Remodel.
- Leave the prefilled Template, Date, Invoice #, Bill To, and Ship To details. If you are working in your own data, optionally choose a different template.
- Select the Floor Plans item in the Item column.
- Accept the prefilled description.
- In the Quantity field, type 2 and leave the U/M (Unit of Measure) field blank.
- In the Rate field, type 100.00. QuickBooks did not include a rate because the item record did not have a value recorded in the Sales Price field of the stored item record. QuickBooks automatically calculates the row total. The item used, Floor Plans, is a nontaxable item (per the original setup of this item) even though the customer is taxable.
- (Optional) Select to include a link on the invoice for your customer to pay online. Links include options for your customer to pay with a business check only or allowing your customer to choose between paying by check or credit card.
- (Optional) Select or create a new Customer Message that will display on the invoice for your customer.
- (Optional) Type a Memo. This detail will be included in your reports and will not be included on the customer’s invoice.
- Leave the Sales Tax item selected. This location is assigned to the original setup of your customer on the Sales Tax Settings tab of the customer (not job) record.
- Leave the assigned Customer Tax Code; this is also set up with the customer’s record.
- To preview this invoice, on the Main tab of the ribbon at the top of the Create Invoices dialog box, for this exercise click Save. Choosing Save at this time will make it easier to preview the invoice in the next step. Normally you will be selecting the Save & Close or Save & New options at the bottom of the transaction when working in your own data.
- In the Print drop-down list, select Preview. (Optional) Click the Zoom In button to see more details.
- Click Close to return to the Create Invoices dialog box.
- Click Save & Close if you have completed this task, or click Save & New to practice creating another invoice.
–> Here’s a quick tip: When entering data, you can use common keyboard shortcuts to complete transactions. For this exercise, start typing Rice into the Customer:Job field, and the customer Rice, Linda displays. Without leaving the field, press the Ctrl key while you tap the down-arrow key to navigate through the list from that point forward. When you have the proper job selected, use the Tab key to advance to the next field.
Do you routinely add multiple items to your invoices? QuickBooks Enterprise Solutions 12.0 (all editions) includes the capability to select multiple items in one easy, searchable window, as shown here:
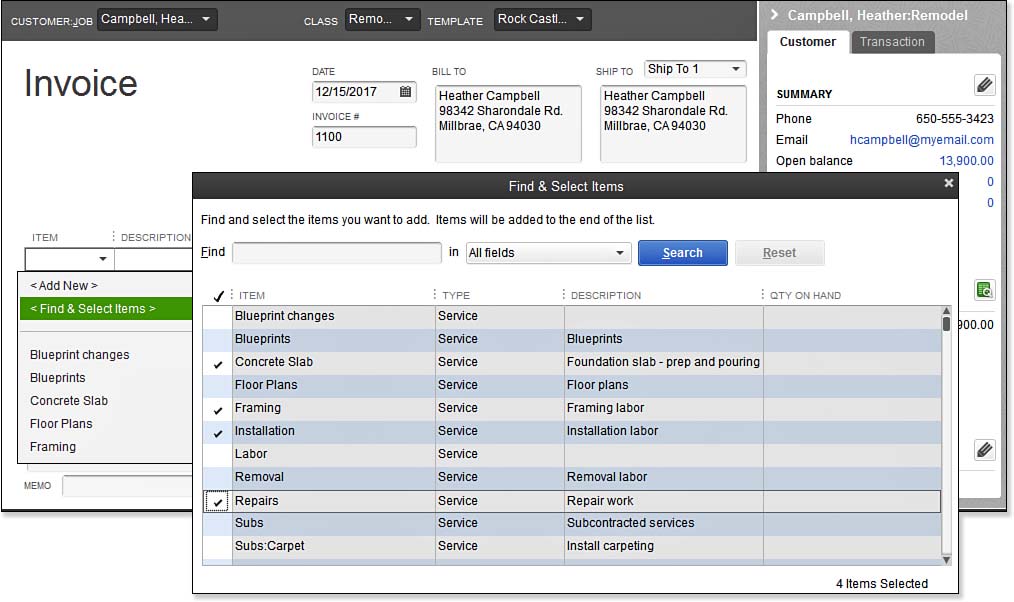
QuickBooks Enterprise includes the capability to quickly add multiple items to an invoice.