


 Printer Friendly Version
QuickBooks Statement Writer (QSW), available with QuickBooks Accountant or all versions of QuickBooks Enterprise creates a PDF of financial report sets that you can print, send via email, and store for future reference. To print or export a Statement Writer report, follow these steps:
- Launch the QSW tool from within QuickBooks (Accountant or Report menu from the Menu Bar).
- If you have just opened your QSW Report, the QuickBooks data has automatically refreshed. If you have been modifying the QSW report or QuickBooks data, refresh the data by clicking the Refresh button on the Document Actions pane.
- From the Document Actions pane, select Save As, QSW Report, Excel Workbook, Template Group, or PDF.
- If you selected Save as PDF, the Create PDF dialog box displays as shown below. The Available Report Contents show each of the statements and supporting documents you have included in this QSW report. On the left pane, select a statement or document to include in your PDF.
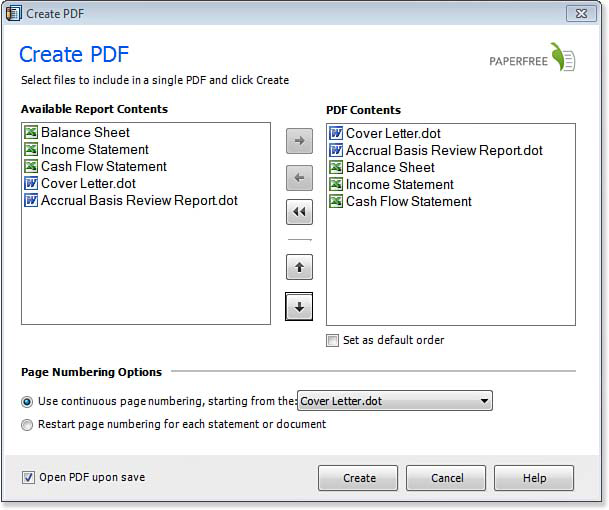
You define the print order of the documents when creating a PDF.
- Use the arrow pointing to the right to include the selected statement or document in the PDF Contents pane.
- Select an item in the PDF Contents pane, and use the up or down arrow to organize the print order for your financials.
- (Optional) Select Set as Default Order so you do not have to make these choices again.
- (Optional) Select Open PDF upon Save.
- Click Create.
- Select Save as Excel Workbook. QSW opens a Windows Explorer window.
- Browse to the computer folder to which your Excel workbook should be saved and give the workbook a filename. Click Save.
A word of caution: When you export your QSW report to Excel, it is no longer linked to QuickBooks and therefore cannot be updated or refreshed.
Accounting professionals can use QSW to create financial reports that include statements and supporting documents. These reports can be saved as templates for use with other client files and for updating with future dated information.
From Laura Madeira’s QuickBooks 2013 In Depth