


 Printer Friendly Version
Timekeepers can track time using the QuickBooks Timer even if they do not have access to the QuickBooks data file. However, to be current with the list of customers, jobs, or service items, the QuickBooks Administrator should frequently export the lists as detailed in Chapter 18 of Laura Madeira’s QuickBooks 2013 In Depth.
If you do not have the QuickBooks Timer installed, from the Help menu type “QuickBooks Timer” for a link on instructions for downloading.
To begin tracking time using the QuickBooks Timer, follow these steps:
1. Launch the QuickBooks Timer. If you recently installed the timer, you can launch it by clicking the Start button in Windows, All Programs, QuickBooks Timer, QuickBooks Pro Timer.
2. In the QuickBooks Pro Timer window, click New Activity.
3. Select the Date, Your Name (timekeeper), Customer:Job, Service Item, optionally Class, and then enter an optional Note as displayed here:
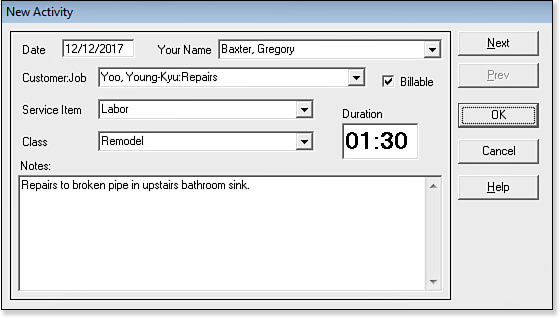
Enter your time after the service is performed, or click OK to start a “stopwatch”
type of timer for the activity.
4. (Optional) Select Billable if this item will be included on a customer’s invoice.
5. Click OK. The Timer shows the current activity. Click Start.
6. The QuickBooks Timer now begins a stopwatch type of timer. If instead you are entering your time after the service is performed, enter the time in the Duration field.
7. Click Edit at any time you need to change the time recorded.
8. Click Stop to stop the timer and Resume to begin timing again. See image below:
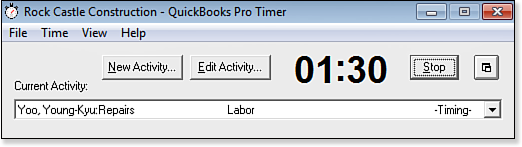
You can choose to use a stopwatch timer to track activities.
9. Click Stop when you are done with the selected task.
Here’s an additional tip from Laura Madeira’s QuickBooks 2013 In Depth:
Time format can be in decimal (10.20) or minutes (10:12). Log in to the QuickBooks data as the Admin user and then from the menu bar, select: Edit, Preferences, General, Company Preferences tab.
From Laura Madeira’s QuickBooks 2013 In Depth