


 Printer Friendly Version
It is a good practice to protect your QuickBooks data and safeguard it against some unforeseen catastrophic event. In addition to making a backup of your data regularly, you might also consider including power protection, virus protection, and computer disk defragmentation.
Even with the best planning and safeguards, unforeseen catastrophic events can happen. Safeguard your company data by creating a regular backup.
Ideally, you should back up your company files at the end of each session. However, if you are working in a multiuser environment, you should routinely wait until the end of each workday to back up. If your computer has more than one drive, you can back up onto a different disk drive from the one where your QuickBooks data is normally stored. If you have only one hard drive, you should back up onto some type of removable media, such as a USB flash memory drive.
To make a backup of your QuickBooks data, follow these steps:
1. From the menu bar, select File, Back Up Company, Create Local Backup. The Create Backup dialog displays with Local Backup selected.
2. (Optional) Click the Options button. The Backup Options dialog box displays as shown below. Setting these options enables preferences for this and future backups.
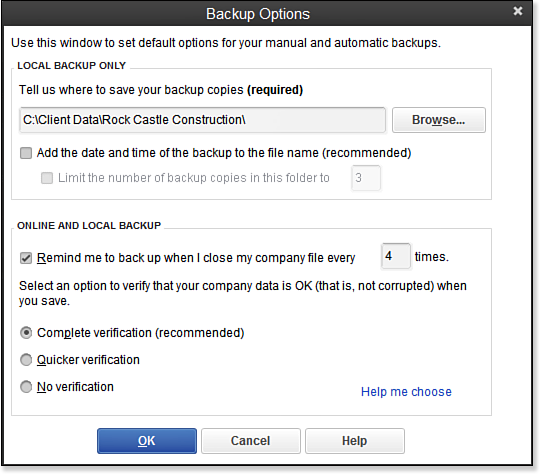
Create a backup of your QuickBooks file for safekeeping.
3 Choose the Browse button and browse to select a location to save your backup. It is recommended that you save your backup file to a location other than the location where the data is stored.
4. (Optional) Choose to Add the Date and Time, and to Limit the Number of Backup Copies in the selected folder.
5. Select the Complete Verification (recommended) option. For more information, see the section titled “Using the Verify Data Utility” in chapter 17 of Laura Madeira’s QuickBooks 2013 In Depth.
6. Click OK. If you have selected a location for the backup that is the same as where the data is stored, a warning message might display, recommending that you Change Location for the backup copy. Click Change Location (recommended) or Use This Location.
7. From the Create Backup dialog box, click Next.
8. Select Save It Now and click Next.
9. Type a filename for your backup, or accept the default filename.
10. Click Save.
For instructions on how to automate your QuickBooks backup, see the section of Chapter 17 of Laura Madeira’s QuickBooks 2013 In Depth titled “Automating Your QuickBooks Backup.”
Here’s an additional tip from Laura Madeira’s QuickBooks 2013 In Depth:
You can perform a backup with multiple users logged in to the file. However, the backup process will not perform the recommended verification of the data as part of the backup.
From Laura Madeira’s QuickBooks 2013 In Depth