If you suspect errors with your financials, drilling down (double-clicking with your cursor) on the Total Income, Cost of Goods Sold, or Expense totals from a Profit & Loss Standard report might provide clues to the mistakes. To generate this report for your data, follow these steps:
1. From the menu bar, select Reports > Company & Financial > Profit & Loss Standard.
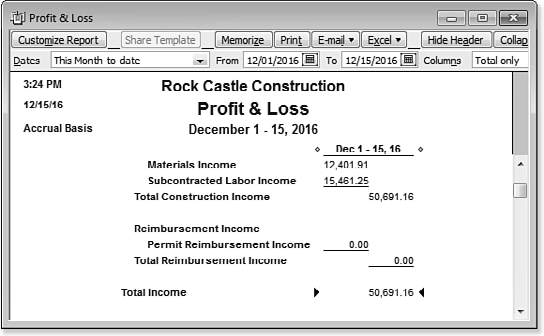
2. On the Profit & Loss Standard report, double-click the Total Income subtotal, as shown below. A Transaction Detail by Account report displays, showing each line of detail that makes up the amount you viewed on the original Profit & Loss Standard report.
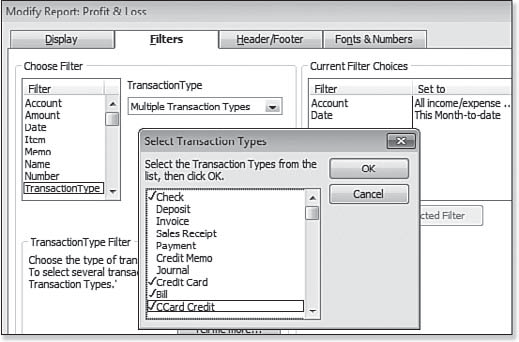
3. On the Transaction Detail by Account report, click Customize Report. In the dialog box that displays, click the Filters tab. In the Choose Filter pane, scroll down to select Transaction Type.
4. In the Transaction Type drop-down list, select Multiple Transaction Types – see below. The Select Transaction Type dialog box displays. Click to place a checkmark next to each transaction type that normally would not be reported to an income account, such as a check, bill, credit card, and so on, and then click OK.
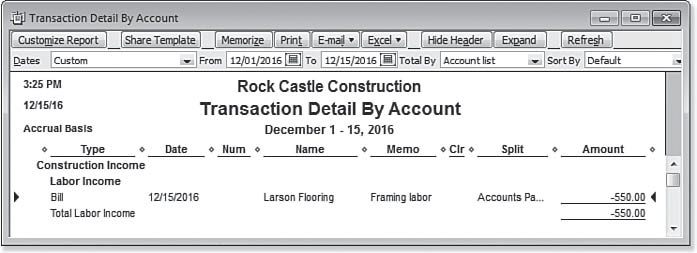
The resulting report now shows all purchase type transactions (or whatever transaction types you selected) that were recorded to income accounts. In the example shown below, a vendor bill transaction type displays in the totals for income. This is because on the vendor bill an item was used that had only an income account assigned. After you determine you have these types of errors in posting, you should review your item list for any one-sided items. For further information on “Correcting One-Sided Items,” see Chapter 4 of Laura Madeira’s QuickBooks 2012 In Depth.

The Transaction Detail by Account report shows a purchase type transaction reporting to an income account in error.
As with any data correction in QuickBooks, you should make a backup of the data before attempting these methods. The preferred backup method is a QuickBooks backup (a file with the extension of .QBB). You can create a data backup by selecting File, Create Backup from the menu bar. If the result after fixing items is not what you expected, you can easily restore the backup file. This section has shown some effective ways to determine whether your items were incorrectly set up. In the next section, you learn the methods of fixing these item setup errors in QuickBooks. If you are an accounting professional, you will want to review your client’s item setup and possible errors using the Client Data Review features and tools available only with QuickBooks Accountant 2012. More information can be found in Appendix A,“Client Data Review” in Laura Madeira’s QuickBooks 2012 In Depth.
tip
These methods might affect your financials for prior accounting periods. You should take care when selecting a method that will impact financial periods that have already been used to prepare your tax documents. Discuss these choices with your accountant before making the changes. If you would like to be warned when making changes to prior periods, consider entering a Closing Date into your file. For more information, see Chapter 16 “Sharing QuickBooks Data with Your Accountant” in Laura Madeira’s QuickBooks 2012 In Depth.


