


 Printer Friendly Version
Tracking and Reporting Vendor 1099-MISC Payments
Click here if you would like to download a PDF of this Blog Article.
ISSUE TO SOLVE: New for 2011, the IRS requires all credit card payers (Amex, MasterCard, Discover, etc.) to report on Form 1099-K any payments made to qualifying Vendors using the same guidelines for issuing 1099-MISC.
PROBLEM: QuickBooks allows users to use the Write Check form (CHK) and the Bill Payment Check form (BILLPMT) or Vendor Credit form (Credit) when a vendor bill was used to record the expense (or reduction of expense) and a credit card was used to pay the bill or refund the amount.
SOLUTION: If your client recorded the vendor charges using the Credit Card transaction type or if in the Pay Bills window the method of Credit Card was selected QuickBooks will exclude these payments from your 1099-MISC. Income reporting. As of the writing of this article this was true only for QuickBooks 2012. Intuit is currently beta testing methods for prior editions of QuickBooks.
WORKAROUND: For users that used the Write Check or Bill forms for recording payments to vendors by credit card, they will need to modify the Number field on each Write Check or Bill Payment Check per the details provided in Table 1, listed below.
HELPFUL INFORMATION: You can find more details here: 1099-MISC. IRS Instructions
The following is an excerpt from my new book, QuickBooks 2012 In Depth, available late February 2012.
If your company pays individuals and certain types of businesses you may need to file a 1099-MISC Income form at the end of the year. Currently, only vendors paid $600.00 or more in a calendar year are required to be reported to the IRS.
Accompanying Form 1096 is also required and summarizes the individual filed 1099 documents.. QuickBooks will print both the 1096 summary and individual 1099 forms, using pre-printed tax forms available through Intuit or most office supply stores. Or, new for calendar year ending 12/31/2011, Intuit is also offering the option to use Intuit’s E-File Service for filing your 1099 and 1096 tax forms.
CAUTION: The newly designed QuickBooks 1099 Wizard was updated to assist with 2011 tax year reporting changes made by the IRS. Make sure you are on the latest release of the QuickBooks software.
As of the publication of this article, the latest release is R5 issued in December, 2011.
Properly setting up your 1099 tax form preferences in QuickBooks will ensure compliance with federal tax reporting guidelines. If you have specific questions about what type of vendor should receive this document, refer to the www.irs.gov website or contact your company’s accountant or tax advisor.
Let’s get your file ready to track and report your 1099-MISC payments to vendors using the six steps in the new QuickBooks 1099 Wizard.
Step 1: Select Your 1099 Vendors
Not all vendors are required to receive a 1099-MISC form at the end of the year. Make sure you have reviewed the reporting requirements on the IRS website of have asked for advice from your company’s accountant or tax advisor.
1, Log into your file as the Admin or External Accountant user.
2. From the Edit, Preferences menu, scroll down the list of preferences and select the Tax:1099 preference.
3. Click on the Company Preferences tab. Select the Yes option for Do you file 1099-MISC forms?
4. Select the click here link for If you’re ready to prepare your 1099’s, including mapping accounts.
5. Click Yes to the Save Changes message if displayed. QuickBooks opens the 1099 Wizard displayed in Figure 1.
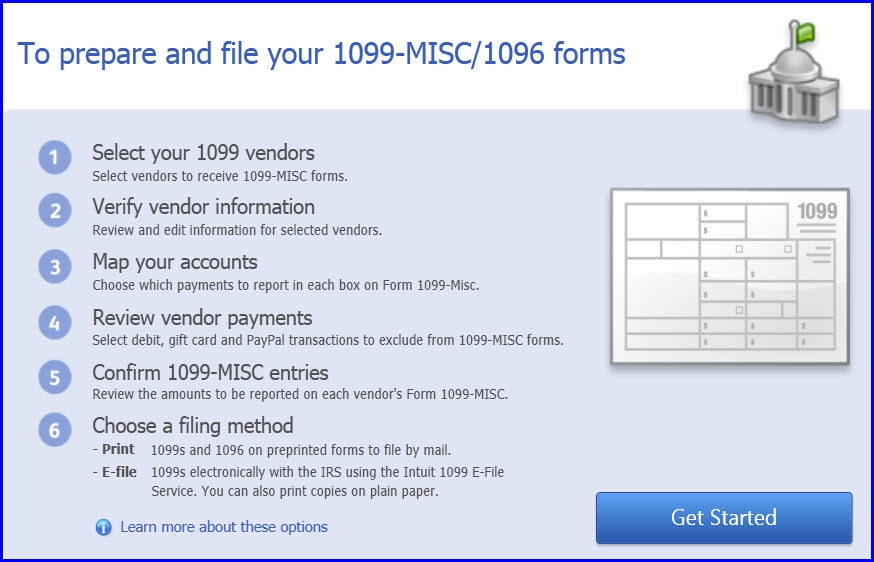
Figure 1 – Use the 1099 Wizard for setting up and tracking vendor 1099 payments with six simple steps.
6. Review the steps and select Get Started.
7. Place a checkmark in front of those vendors you want to track 1099-MISC earnings for. Optionally click the Select All. See Figure 2.

Figure 2 – Using the 1099 Wizard you will select the vendors you will be preparing a 1099-MISC. Income form for.
8. Click Save & Close if you are not ready to complete the remaining steps in the 1099 Wizard or click Continue to advance to the next step.
Do not worry here if you are uncertain which vendors to select. You can always come back and make changes. You should also select all the vendors that should get the required tax form. If they do not make enough the meet the IRS established threshold during the year (currently $600.00), QuickBooks will not include them in the forms that are printed.
Step 2: Verify Vendor Information
One of the important steps to take to properly tracking your vendors payments subject to 1099 filings is to record the vendors Tax ID and select the Vendor is eligible for 1099 as previously displayed in Figure 6.6. You can request this information from your vendor using the IRS form W-9, Request for Taxpayer Identification Number and Certification. This form can be downloaded from the www.irs.gov website.
If you didn’t have this information available when you initially create your vendor record, no worries, you can add this information at any time during the year and QuickBooks will include the vendor payments in your 1099 reporting.
1. If you selected Continue after step 1 above, you will now Verify your 1099 vendor’s information.
2. For the vendors you selected, make sure you have the Tax ID, Company Name, Address and other information for each of your selected vendors. See Figure 3.
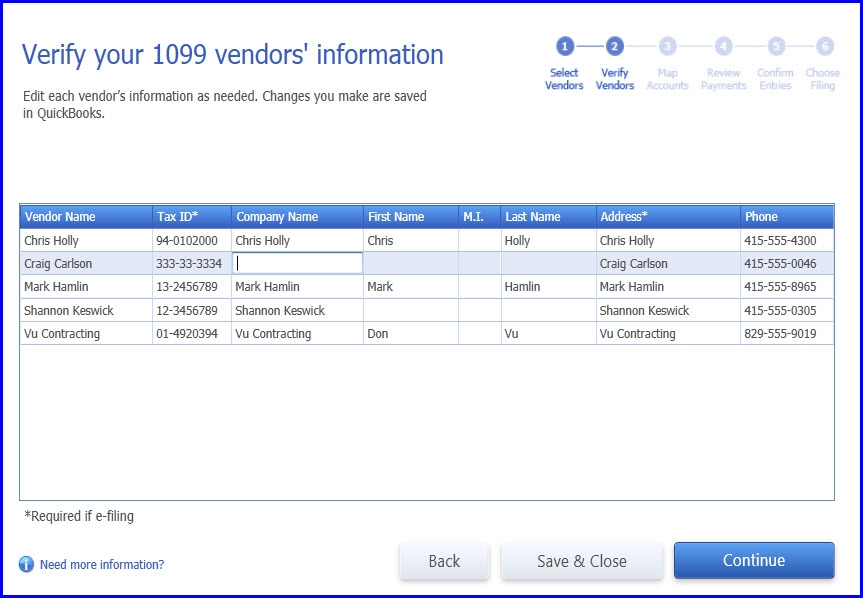
Figure 3 – Review and modify the vendor’s information directly in the 1099 Wizard.
3. If information is missing, with your cursor, click in the field and enter the missing information.
DID YOU KNOW?
The end of any calendar year is a busy time. Consider reviewing your vendor’s 1099 information throughout the year so that you have time to collect the missing information before the tax forms are due.
Generally, you have to provide the vendors with their 1099-MISC. Income forms by the end of January following a calendar year. Some will want their forms as early as possible January, so be prepared early.
4. Click Save & Close if you are not ready to complete the remaining steps in the 1099 Wizard or click Continue to advance to the next step.
Step 3: Map Your Accounts
QuickBooks provides you the option of including or excluding specific chart of accounts from being used when reporting your vendor’s payments. For example, you might pay your vendor for services and record that to a specific Subcontractors expense account. You might also reimburse that same vendor for materials purchases and record that portion of the expense to a different expense account.
It is not the intent of this book to provide tax filing advice, so please check with the IRS website for more details or ask your company’s accountant or tax advisor.
1. If you selected Continue after step 1 above, you will now Verify your 1099 vendor’s information.
2. For the vendors you have selected, the 1099 Wizard will display the accounts that were assigned on the vendor payments. For each account displayed, you can choose to omit these payments from 1099-MISC. Income reporting or select from several 1099 box reporting options, see Figure 4.
CAUTION: The only 1099 form that QuickBooks will print or that can be processed by Intuit 1099 E-File Service is the 1099-MISC Income. Payments in QuickBooks can be assigned to any of the 14 boxes on the 1099-MISC Income form.
Multiple cost of sales, ordinary expense and other expense accounts can be assigned (mapped) to a single box on the 1099-MISC Income form. However, a single account cannot be assigned to more than one reporting box on the form.
If a Balance Sheet account is used when recording a payment to a 1099 eligible vendor; that account will not display by default in the Map vendor payment accounts. However, if you select Show All Accounts, you are provided the option to Omit the payments recorded to the Balance Sheet account from 1099 or assign to the appropriate 1099-MISC. Income box.
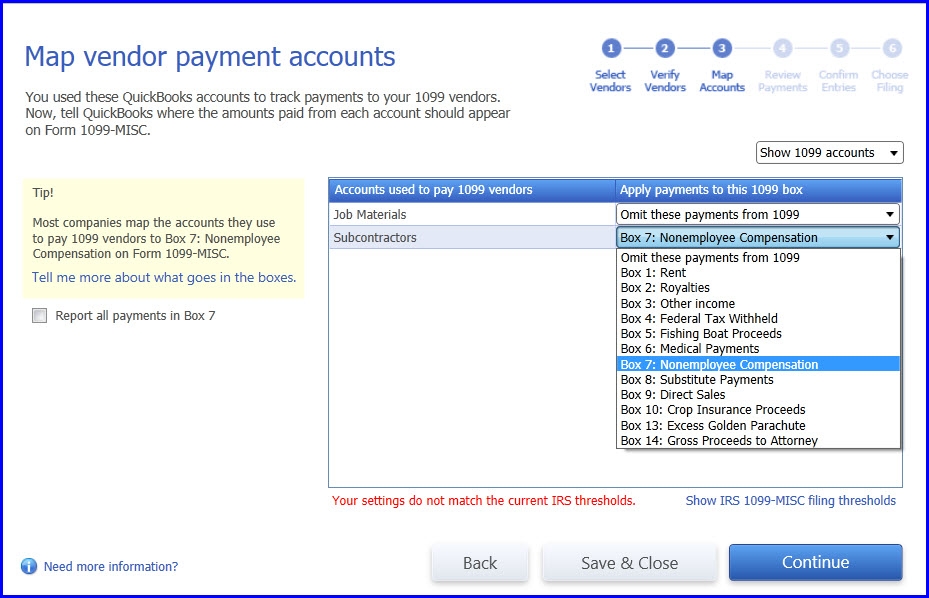
Figure 4 – Selectively choose which accounts are reported or omitted from your 1099 reporting.
3. Optionally click the Show 1099 accounts drop down and select the Show all accounts if you want to Omit or map your 1099 reporting for all of your accounts on your chart of accounts.
4. Optionally place a checkmark in the box Report all payments in Box 7. By doing so, all the displayed accounts will now be assigned to Box 7:Nonemployee Compensation.
5. If you see the warning message “Your settings do not match the current IRS thresholds”, click the Show IRS 1099-MISC filing thresholds link.
6. Read the information displayed in the 1099-MISC IRS Thresholds window. Click the button Reset to IRS thresholds. QuickBooks updates the Thresholds with current tax information.
7. Click Save & Close to return to the 1099 Wizard.
8. Click Save & Close if you are not going to complete the remaining steps in the 1099 Wizard or click Continue to advance to the next step.
Step 4: Review Vendor Payments
Do you pay your vendor bills by credit card? Beginning with the 2011 tax year, the IRS requires you to exclude from Form 1099-MISC any payments you made by credit card, debit card, gift card, or third-party payment network such as PayPal. (These payments are being reported by the card issuers and third-party payment networks on Form 1099-K.) You will want to review your Included and Excluded Payments from the Review payments for exclusions window displayed in Figure 5.
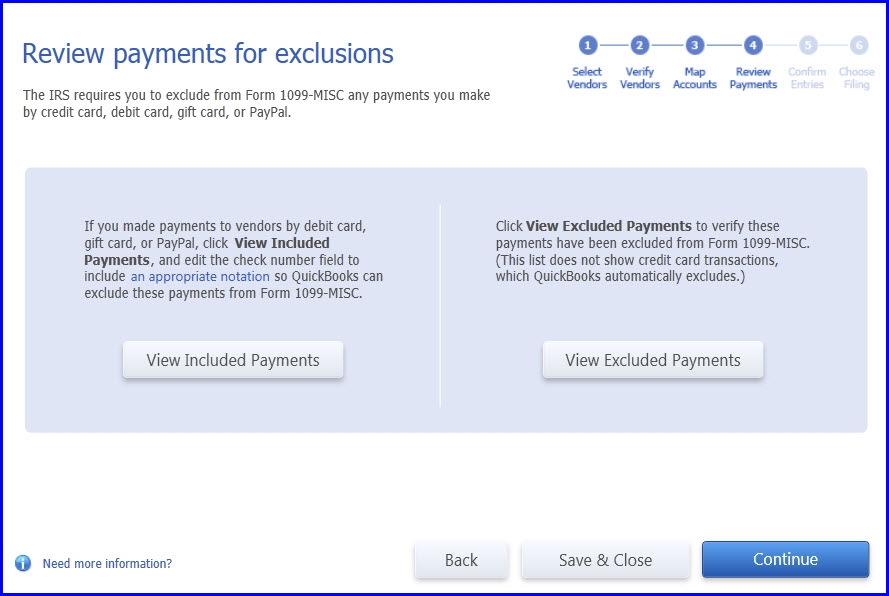
Figure 5 – With the new 1099 rules in place for year ended 2011, verifying that the proper payments are included or excluded is provided as part of the 1099 Wizard.
When you use check payments (in either Pay Bills or Write Checks) to record a vendor payment made with a credit card, debit card, or gift card, or using a third-party payment network such as PayPal, you should note the payment method in the check number field. QuickBooks recognizes, and automatically excludes from Form 1099-MISC, any check payment containing one of the following notations in the check number field (limited to 8 characters):
Table 1 -When recording credit card payments using a Bill Payment Check or Write Check form, assign these in the check number field.
| Debit | Debitcar | DBT |
| DBT card | DCard | Debit cd |
| Visa | Masterc | MC |
| MCard | Chase | Discover |
| Diners | PayPal |
DID YOU KNOW?
Save yourself time from having to modify the check number assigned to bill payment checks or the write checks form when recording vendor 1099 payments made by credit card using these forms. Instead, when paying a vendor bill assign the payment to a credit card account or use the Banking, Enter Credit Card Charges transaction to record the expense.
QuickBooks automatically excludes from Form 1099-MISC any bill payment made using the credit card payment type transaction.
1. Click on the View Included Payments. QuickBooks creates a report titled “Check Payments Included on Forms 1099-MISC” see Figure 6.

Figure 6 – Review checks recorded as payments to vendor’s that may have actually been paid by credit card.
2. If any of these payments were made by credit card, debit card, gift card, or third-party payment network such as PayPal you will need to edit the check number, displayed in the Num column on this report.
3. With your cursor double click to open a single transaction that was paid by credit card. The Write Checks or Bill Payments(Check) displays. Modify the information in the No. field using one of the accepted notations listed above.
4. Click Save & Close to save your changes.
5. QuickBooks no longer includes this payment in your 1099 reporting.
6. Click on View Excluded Payments button. QuickBooks creates a report titled “Check Payments Excluded from Forms 1099-MISC”. Verify that the transactions listed on this report qualify to be excluded from 1099-MISC Income reporting.
7. Click the X in the top right corner to close the report(s).
8. Click Save & Close if you are not going to complete the remaining steps in the 1099 Wizard or click Continue to advance to the next step.
Step 5 – Confirm 1099-MISC Entries
The 1099 Wizard displays a list of the Vendors that will be receiving a 1099-MISC. Income form see Figure 7.
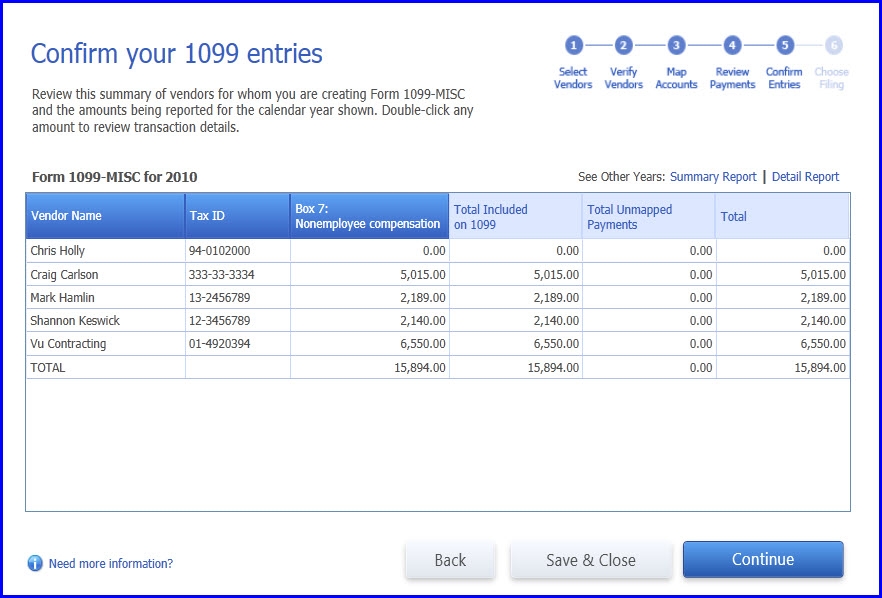
Figure 7 – Preview vendor payments that will be included or not included in your 1099-MISC. Income end of year reporting.
1. Click the Summary Report link to see a summary for all vendors included in your 1099-MISC. Income reporting. Modify the dates and filters as needed.
2. Click the X in the top right to close the 1099 Summary report.
3. Click the Detail Report to see a list of all transactions grouped by vendor. Modify the dates and filters as needed.
4. Click the X in the top right to close the 1099 Detail report
5. Click Save & Close if you are not going to complete the remaining steps in the 1099 Wizard or click Continue to advance to the next step.
Step 6: Choose a Filing Method
The QuickBooks 1099 Wizard provides information to help you choose a filing method, either printing or electronically filing the forms. See Figure 8.

Figure 8 – The 1099 wizard makes it easy to print 1099 forms or file electronically.
If you opt to print your 1099s forms:
1. Click the Order forms link to order your tax forms from Intuit. You may also purchase tax forms from your local office supply store.
2. Click the Print 1099s to print on the preprinted forms that you’ve purchased.
3. QuickBooks 1099-MISC and 1096 Forms dialog displays. Select the appropriate year you are printing your forms form. Typically you would be selecting Last Calendar Year.
4. Select 1099s to Print dialog displays with each vendor selected. Optionally click the Select All or Select None if needed.
5. QuickBooks displays the number of vendors selected and the total dollar amount for the selected vendors.
6. Click Print 1099. The Print 1099s settings display. Place the tax forms in your printer and select Print. You will need to print on preprinted forms; unlike W-2’s the IRS does not accept 1099 forms on plain paper.
7. View the documents that printed. When completed printing 1099, click Print 1096 and insert in your printer the pre-printed form.
8. Enter the Contact Name in the 1096 Information dialog box. If circumstances warrant select This is my final return.
9. Select your printer and click Print. QuickBooks returns to the Select 1099s to Print.
10. When complete, click the X in the top right corner to close the Select 1099s to Print window.
If you will be E-Filing click the Go to Intuit 1099 E-File Service. Follow the instructions for filing. You will complete three steps:
1. Sign up for the service – Using your Intuit Account username and password.
2. Set up Intuit Sync Manager – Enables QuickBooks to send your information to the Intuit E-File 1099 Service.
3. Purchase, print and e-file – Print and e-file your returns with a click of a button.
The information window provides a toll-free number to call if you have any questions. 1099 forms for a given tax year cannot be filed until January of the following year.
You have successfully completed the steps to properly track and report your vendors 1099-MISC. Income payments.
Note: As of the date of this article Intuit is beta testing methods for handling the new 1099 Reporting for QuickBooks 2010 and 2011. As this information is made available I will update this article.
This article is a sample of the QuickBooks information and training included in Laura’s new book QuickBooks 2012 In Depth, published by QUE, for more information visit my website:
Pingback: 1099 reporting changes | Time & Cents Consultants LLC, Software Consultants
Pingback: What gets reported on 2011 1099-MISC | CrackerJack Accounting